Garage doors are probably one of the most regularly used parts of your home since you use them to access your car and storage space every day. Over time, the components of your garage doors, including the springs, inevitably get worn out. The next thing you know, you’re dealing with broken springs and then you have to learn how to replace garage door springs!
No need to worry—at Jolly Goat Garage Doors, we know all about replacing springs, including old-style garage door springs. By old-style, we mean springs like garage door extension springs and torsion springs rather than the more advanced types of springs such as high-cycle springs or steel rolling door springs (though we know how to handle those, too!).
We’ll guide you through the important points you should know about replacing these springs, going over topics like the different types of garage door springs, why you should replace garage door springs, materials and tools you’ll need, and most importantly, a detailed step-by-step guide on the replacement process.
Related Article: Signs of Worn or Broken Garage Door Springs: What You Need to Know
Let’s get into it!
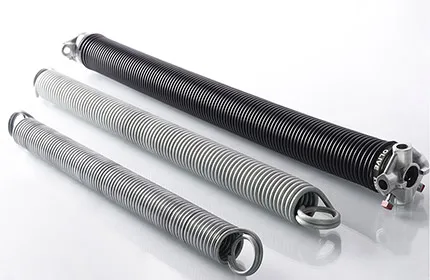
Types of Garage Door Springs
If you’re going to be replacing your garage door springs, it’s important that you know what type of garage door springs you’ve got at home. Here’s a quick rundown of the most common old-style or traditional garage door springs:
Garage Door Extension Springs
Extension springs are typically located on either side of a garage door. They’re coiled springs that stretch horizontally alongside the garage door tracks when the door is in a closed position.
When the door closes, the extension springs are stretched and hold spring tension. Then, when the door moves to an open position, the spring contracts and helps lift the door.
- Standard Extension Springs: An extension spring is commonly used in older garage doors. They’re coiled springs that are located on both sides of the door, parallel to the door tracks.
- Safety Extension Springs: The main difference between this type and the standard ones is that safety extension springs have a safety cable running through the center. These safety cables are meant to prevent the extension springs from violently flying off and causing damage (or injuries) should they break.
Garage Door Torsion Springs
A torsion spring is a tightly wound metal found above the garage door opening. These springs are attached to a metal shaft going through the center of the springs. Similar to extension springs, torsion springs also utilize stored spring tension to lift the door when the automatic garage door opener is in use, though the springs also assist in opening the door when done manually.
- Standard Torsion Springs: These springs use torque to help get the garage door open. This type of garage door spring is wound tightly to store energy, which is in turn released as the garage door opens.
- One-Piece Torsion Springs: This type of torsion spring is typically found in older one-piece garage doors (as opposed to sectional doors) and is mounted along the top of the garage door. These torsion springs help counterbalance the weight of the heavy door as it’s operated.
Why You Should Replace the Springs of Your Garage Doors
Having a broken spring is a serious safety hazard. It leaves you with a faulty garage door that can—in the worst cases—send you to the emergency room after a terrible accident in your garage. Even if only one spring is broken, it’s in your best interest to replace it as soon as possible. When a spring breaks and is left unattended, the garage door can become unbalanced and suddenly drop, leading to damage and injury.
Additionally, using a garage door that has a broken spring wire can negatively affect other parts of the garage door. You might end up with more damages that require a more complicated (and expensive) garage door repair. So, it’s better to promptly replace the old spring with a new spring to ensure your safety.
Is the Spring Replacement Process the Same for All Types of Garage Doors?

Generally, the process of replacing garage door springs can differ depending on the design and type of your garage door. The process is similar enough, but keep these considerations and tips in mind if they apply to your situation:
- Wooden Garage Doors: Wood is heavier than other materials, so you should choose replacement springs that are stronger and more durable.
- Metal or Steel Garage Doors: These types of garage doors typically use standard torsion springs or extension springs.
- Plastic or Composite Garage Doors: As these materials are lighter than the usual garage doors, you can consider using lighter springs. Other than that, the installation process for these types of doors is similar to other materials.
Materials and Tools Needed for Garage Door Spring Replacement

To replace garage door springs, prepare the following materials and tools:
- Replacement springs
- Safety cable
- Winding bars
- Adjustable wrench
- Vice/vise grips
- Two C-clamps
- Safety gloves and glasses
- Socket wrench set
A Step-by-Step Guide to Replacing Garage Door Springs (Torsion Springs and Extension Springs)
Replacing garage door springs is a pretty straightforward process. Follow these steps and you’ll have a secure and functional garage door in no time!
Safety First!
Remember to prioritize your safety! Wear protective gear like safety glasses and gloves to protect yourself throughout the spring replacement process.
Step 1: Purchase New Springs
Springs: Buy springs from your local hardware store. Make sure you’re getting the correct springs that match the exact type (garage door extension spring wires or tension spring wires), size, and weight capacity. Torsion springs and extension springs are often color-coded based on factors like weight capacity, thickness, and length.
Safety Cables: Consider getting a safety cable if you don’t have one or if it requires replacement. If your springs break again, a safety cable offers an extra layer of protection.
Professional Assistance: If you’re not sure about which springs you should buy, consider consulting a professional garage door technician for assistance. They’ll make sure you’re getting the right springs that are compatible with our garage door.
Pro Tip: Even if only one spring broke, we recommend replacing the other spring on the opposite end of the garage door, along with the center bearing. Replacing both springs ensures the spring system is balanced and avoids uneven tension, which can lead to misalignment and general inefficiency. Also, if one spring wire breaks, it means the other spring is also nearing the end of its lifespan. It’s more efficient to just replace two springs at once rather than waiting for the other one to (inevitably) break as well.
Step 2: Remove the Old Springs
Torsion Springs
For torsion springs, use a winding bar to unwind the spring wire and release tension. Stick the winding bars into the winding cone on each end, then turn them to loosen the metal coils. Now, use C-clamps or vise grips to keep the spring wire in a firm grip.
Make sure all the tension has been released. Unscrew the two bolts holding the torsion springs secured to the center bracket above the garage door. Then, slide the springs off the tube.
Extension Springs
If you’re replacing an extension spring, start by making sure the garage door is in an open position. This releases the coiled-up tension in the extension springs.
The next step is to unhook each extension spring from its pulley and track bracket on the garage wall. These track brackets are on either side of the door. Lastly, detach the extension springs and properly dispose of each old spring.
Step 3: Install Replacement Springs
Torsion Springs
To start, slide one end of the new torsion spring onto the torsion tube or torsion shaft. Use winding cones to keep it in place, along with the screws that came with the new springs.
Then, use winding bars to wind the spring, and insert the winding bars into the holes on the winding cone, which can be found at each end of the spring shaft. Do this until it’s sufficiently tight. Make sure each side is winded equally to ensure balance.
Extension Springs
Hook one end of the extension spring onto the track bracket. Then, hook the free end onto the pulley system. Now, you have to move the adjustment clips as well as the spring length to make sure the springs provide the proper amount of force to keep the garage door balanced.
Step 4: Wind and Tension the New Springs
Torsion Springs
For this step, you’ll be using your winding bar again. Insert the winding bar into the holes on the winding cone at the end of the spring and tighten it. Once properly wound, tighten and secure the screws on the winding cone. Ensure that the torsion spring is attached to the torsion tube.
Extension Springs
If you’re working with extension springs, you can adjust the tension of the spring wire by hooking one end of the spring to the track bracket and the opposite end to the pulley system. Then, move the adjustment clip along the spring as needed to add or reduce tension. If required, you can also change the length of the spring by using the hooks that came with it or by adjusting the attachment positions or points.
Step 5: Test the Garage Doors
Now for the testing stage. Start by disconnecting the garage door opener and lifting the door manually. Pay attention to how smoothly or easily the door moves. If it feels too heavy or you encounter any complications, your springs may need further adjustment. You should also give it a halfway test—lift the door to a halfway point and let go. It should stay in place, and if it doesn’t, some adjustments may be needed.
Maintenance Tips After Replacing Garage Door Springs

After successfully replacing your garage door springs, you want them to last as long as they can and perform well. So, here are some maintenance tips to keep in mind to lengthen the lifespan of your new springs:
Regularly Inspect Torsion Springs and Extension Springs
Check each new spring for damage and signs of wear and rust. As you operate the garage doors, keep an ear out for unusual or loud noises that could indicate problems. Additionally, make sure the springs maintain proper tension; for an extension spring, ensure they’re not overstretched.
Lubricate the Garage Door Springs
It’s important to apply garage door lubrication to the springs at least twice a year or every six months. It can address the unusual noises produced by your garage door, make its operation smoother, prevent rust, and reduce damage-causing friction. Ultimately, it’s key to extending your spring’s lifespan.
Schedule Professional Inspections

Here’s another pro tip: arrange professional inspections at least once a year. Professionals like Jolly Goat Garage Doors offer garage door maintenance services, helping point out issues you’ve missed and promptly addressing concerns before they get worse. With regular professional inspections, you can expect your garage door system to last a long time.
Jolly Goat Garage Doors
If you’re looking for garage door spring repair services in Oklahoma City, Jolly Goat Garage Doors is the one for the job! Open 24 hours, our team of professionals can take on any garage door challenge, including faulty garage door springs in need of replacement.
Give us a call at (405) 901-1214 for top-tier garage door services and a happiness guarantee! Visit our Garage Door Spring Information Center for more blogs about garage door springs.