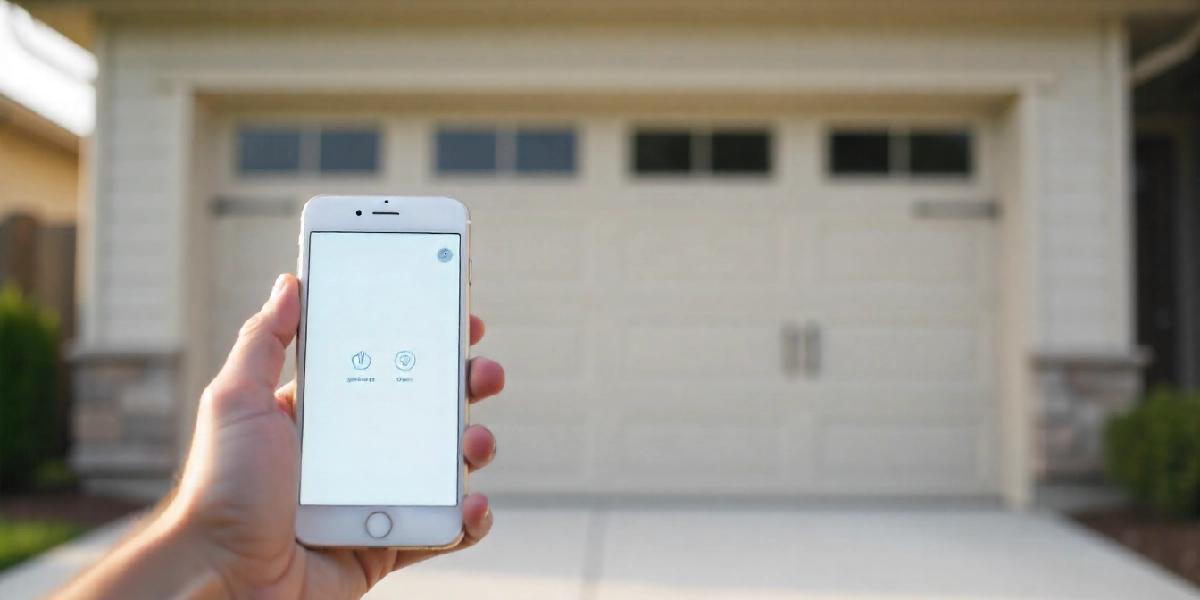
For homeowners in Norman, OK, garage door automation can be especially useful during busy mornings, late-night arrivals, stormy weather, and everyday family routines. Whether your home is near campus, in a quiet neighborhood, or outside the busier parts of town, being able to open and close your garage door quickly from a remote control, keypad, or phone app adds real convenience.
That is where garage automation installation can help. A good setup lets you open and close your garage door with a remote control, keypad, phone app, or wall button. It can also help you detect when the door is open, receive alerts, and better secure your home.
What Is Garage Door Automation?
Garage door automation simply means adding a motorized system that opens and closes your garage door for you, so getting in and out of the garage feels easier and more secure. In most homes, this includes a garage door opener, garage door motor, rail, trolley system, safety sensors, wall button, remote, and sometimes a keypad.
A smart garage door opener adds another layer of convenience. It can connect to Wi-Fi and let you control the door from your phone. You can check if the door is open, close it while you are away, or give temporary access to someone you trust. For busy households, that kind of access can make everyday life much easier.
Before You Install: Inspect the Garage Door First
Before grabbing your tools or opening the opener kit, start with a quick analysis of the garage door itself. A new opener should not be used to force a damaged, heavy, or unbalanced door to work.
It is also important to remember that a garage door is a heavy moving system. The opener does not do all the work on its own. The springs, tracks, rollers, cables, safety sensors, rail, garage door motor, and door balance all play a crucial role. If one part is damaged or out of alignment, the installation process can become unsafe or lead to bigger damage later.
Start with the tracks. They should be straight, secure, and free of dents or heavy buildup. Check the rollers and make sure they move smoothly. Look at the cables and springs, but do not try to adjust the springs yourself. Garage door springs are under high tension and can cause serious accidents if handled incorrectly, so spring repairs and adjustments are best left to a trained professional.
Next, test the door’s balance. With the opener disconnected, carefully lift the door halfway and let go. A balanced door should hold its position. If it drops, shoots upward, or feels too heavy to lift, stop and contact a professional. Installing an opener on an unbalanced door can wear out the motor, damage the rail, and create safety risks.
You should also inspect the garage area. Make sure there is enough ceiling space to mount the opener, enough room for the rail, and a nearby power source. If you notice damaged wiring, loose hardware, or anything that feels unsafe, fix those issues before moving forward.
Tools and Parts Usually Included
Most opener kits include the opener motor unit, rail sections, trolley, chain or belt, door arm, mounting brackets, wall control, remote control, safety sensors, and hardware. Depending on the model, a keypad may also be included.
You will usually need basic tools such as a ladder, socket set, wrench, drill, level, screwdriver, tape measure, and safety glasses. Having the right tools ready before you install the opener can save time and reduce frustration.
Always read the manufacturer’s instructions before assembling anything. Each opener is a little different, and the manual will tell you the correct order for assembling the rail, attaching the trolley, placing brackets, wiring controls, and setting travel limits. Even if you have installed an opener before, do not skip the guide that came with your specific model.
The Installation Process

Once the door has been inspected, balanced, and cleared of any obvious damage, you can proceed with the installation process.
Step 1: Assemble the Garage Door Opener Rail and Attach to the Garage Door Motor
Start by assembling the rail according to the manufacturer’s instructions. The rail is the long track that guides the trolley as the opener moves the door. Depending on the opener kit, the rail may come in several pieces that need to be connected and secured.
Once the rail is assembled, attach it to the garage door motor unit. Then install the belt, chain, or screw-drive system based on the manual. Make sure everything is aligned and properly tightened. If the rail is crooked or loose, the opener may shake, strain, or wear out faster than it should.
Step 2: Mount the Opener Securely
Next, position the opener motor on the ceiling. The rail should be centered with the garage door, and the motor should be mounted to strong ceiling supports. Do not attach the opener to weak framing or thin material that cannot hold the weight and movement of the system.
Use a level to ensure the rail is straight. A level rail helps the door move smoothly and reduces strain on the opener. Secure all brackets tightly and double-check that the motor does not shift when gently moved.
If your garage ceiling is unusually high, finished, or difficult to access, this may be a good time to consult a professional. Proper mounting is crucial for safety and longevity.
Step 3: Attach the Door Arm
Once the opener is mounted, attach the door bracket to the top section of the garage door. Then connect the opener arm from the trolley to the bracket.
This arm is what pulls and pushes the door during operation. It should move freely without rubbing against the door, rail, or other hardware. If the angle looks extreme or the connection feels forced, stop and check the manual again.
Do not drill into a weak or damaged section of the door. If the top panel is cracked, bent, or not reinforced, the opener can cause more damage over time.
Step 4: Install the Safety Sensors
Safety sensors help prevent accidents by detecting an object, pet, or person in the door’s path. These sensors are usually placed on both sides of the garage door near the ground. When something blocks the beam, the opener should stop the door from closing and reverse it.
Install the sensors according to the manufacturer’s instructions. Make sure they are facing each other directly and mounted securely. The wiring should be neat, protected, and connected to the opener as shown in the manual.
After installing the sensors, test them. Place an object in the door’s path and try to close the door. The door should not continue closing on the obstruction. If the sensors do not detect the object, adjust their position until they work correctly.
Step 5: Connect the Wall Button, Remote, and Keypad
After the sensors are in place, connect the wall button and program the remote control. If your opener kit includes a keypad, install it outside the garage in a convenient but secure location.
Follow the programming steps in the manual. Most openers have a learn button that allows you to connect remotes, keypads, and other accessories. Test each button after programming to ensure the door opens and closes properly.
If you are installing a smart garage door opener, this is also the time to connect the opener to your home Wi-Fi. Make sure your garage has a strong signal. Weak Wi-Fi can cause delayed commands, missed alerts, or an opener that appears offline.
Step 6: Set the Travel Limits and Force Settings
Travel limits help the opener know where the door should stop when it opens or closes. If the limits are wrong, the door may stop short, hit the ground too hard, or reverse for no clear reason.
Use the manufacturer’s instructions to adjust the travel limits. Then check the force settings. These settings control how much power the opener uses when moving the door. Too much force can create a safety risk. Too little force can keep the door from closing correctly.
Open and close the door several times while watching the movement. The door should move smoothly, close fully, and stop without slamming.
Step 7: Test the Full System
Before calling the job complete, test everything more than once.
Use the wall button. Use the remote. Use the keypad. If it is a smart garage door opener, use the app. Test the safety sensors again. Check the manual release so you know how to open the door during a power outage.
Listen for grinding, shaking, scraping, or unusual movement. Watch the tracks, rollers, and door panels as the opener runs. If you encounter strange sounds, uneven movement, or repeated reversing, do not ignore it. Small issues can become expensive problems if left alone.
When to Call for Professional Help
Some homeowners can install a garage door opener themselves, especially if the door is already in great shape and the instructions are clear. But if anything feels off, calling a professional is the safer choice.
Contact a garage door professional like Jolly Goat Garage Doors if the door is not balanced, the springs look damaged, the cables are loose, the tracks are bent, the opener wiring is confusing, or the door does not pass the safety test. You should also ask for help if you are replacing an old opener and notice damage around the mount, rail, or door bracket.
Ready for a Smoother, Smarter Garage Door?
Garage automation is one of those upgrades you appreciate every day. It gives you easier access, better security, and the convenience of opening and closing your garage door with the touch of a button.
But the installation has to be done right.
At Jolly Goat Garage Doors, we help Norman homeowners choose opener systems that fit their garage, daily routine, and security needs. Whether you are replacing an older garage door opener, adding smart access to your home, or trying to fix a system that no longer opens and closes smoothly, our team can inspect the door, explain your options, and make sure the installation is done safely.
If your garage door is noisy, unreliable, outdated, or simply ready for a garage automation installation in Norman, contact us today at 405-367-1020 to request a free quote. We will inspect your system, talk through your options, and help you choose the right opener for your home.